Sunday, August 24, 2014

A Most Excellent Detail Casting

I'm still working towards that article on the 3d-printed flat cars. I've printed a bunch of the flat cars over the last month, and currently have seven on the layout. There's a couple of the "extremely rare" and in fact never-built CS-35 36' flat cars, a couple of 40' cars that I built from a stretched model. As I was decaling one, I realized I'd messed up the truck spacing; the true 40' cars set the wheels closer to the center than I'd modeled. After another tweak to the design, I've got two with the correct truck spacing too.

The printed models aren't necessarily a big win over buying commercial cars, nor are they museum-quality; I'm not looking for perfection, just some recognizable models that I can't get elsewhere. Each one of the flat cars requires some finishing and painting. Then the wood deck needs to be stained and glued on, details like the grab irons and brake wheels need to be added. Finally, the cars need to be decaled.

Today's story, though, is about the detailing part. I haven't been putting elaborate brake detail on these cars, but the old-fashioned K-style brake cylinder is a pretty visible detail and worth adding. I had been buying the Tichy plastic brake gear detail kits, but (1) I kept buying out the Train Shop's stock, and (2) at some point paying $3 to grab one little casting seemed wasteful, especially if I want a bunch of cars.

Hey, wait, don't I have a 3d printer?

So, I tried it - took some guesses at measurements, drew something up over a couple hours in SketchUp, and printed it. And it worked - the Form One did a most excellent job on a tiny brake cylinder.

So I upped the detail, adding bolt heads and even the very fine piston rod and clevis. I printed all these at the 0.025" setting on the Form One. A few hours later, I had a dozen brake cylinders, ready for the next set of cars. The photos are worth sharing; if I ever had any doubts about whether the Form One would help me in modeling, this particular piece convinced me. Zoom in to see that the clevis fork printed (though only half printed fully), and notice the bolt detail both around the top of the cylinder, and on the mounting plate at the back of the model.

As a modeler that buys a fair number of detail parts, these brake cylinders completely change the game - I'm no longer dependent on what's available from the store or what's in stock, but instead on what I can manage to draw in a 3d program.

For the folks who are curious how I drew the brake cylinder:

The first step was to get some rough measurements off one of the commercial parts and off official drawings. Once I had rough shapes, I drew a 2d cross-section of the piece's shape, and drew a circle the size of the cylinder bottom in SketchUp. Once I had these, SketchUp's "Follow Me" tool allowed me to drag that cross section around the circle, making what the high school geometry teachers might call a surface of rotation. That gave me the rough 3d object; I extruded 1" diameter, 1" tall cylinders wherever I wanted bolts. The clevis fork was similarly extruding a circle from the cylinder top, then sketching the rectangular shapes on top of that to make the clevis.

The hardest part was the mounting plate on the top of the cylinder. I did this by drawing a 10x16" x 2" thick block, and moving it so it sat on top of the cylinder. Now, this doesn't work so hot because SketchUp doesn't like figuring out the intersections between curved and flat surfaces, so it just leaves the top half of the cylinder inside the block. To make a 3d-printable shape, I deleted the top face of the mounting plate and drew extra edges at the intersection between the round and square faces, then deleted the parts of the cylinder that were stuck inside the plate.

That's pretty sweet work on a part that's less than 3/4" long, and only around 1/8" in diameter. And that part is starting to get to injection molded quality. Tichy's part is a little finer,includes the Westinghouse logo and cylinder size cast right on the side, and its ABS probably can take a bit more abuse than the Form Labs resin. On the negative side, when I look at the commercial part with a magnifying glass (and I'm using that magnifying glass a lot these days), it's easy to see that the mold was misaligned, and the two halves of the part didn't match up.

Tuesday, August 19, 2014

3d Models Available

And if any of you out in blog-reader land are curious about what a 3d model is like, you've now got a chance. I've put some of the 3d designs for things I've been describing here up on the Thingiverse web site. In addition to that 1920's strip mall I built a couple years back, there's now a 3d model for the CS-35 36 foot flat car and for the drying flats.

Each model also has the SketchUp file, so you can modify the design to your heart's content.

Have fun with the models, and let me know if you make anything interesting based on these designs!

Sunday, August 17, 2014

SP Concrete Telephone Booths: The Results

I decided against redoing the design of the telephone booths - the existing models were quite good enough for my layout. Even the ones where the individual flat faces were visible weren't that bad. And, thanks to 3d printing, I've also got around 15 telephone booths finished and painted when I only needed... oh, maybe two. So, no work on a better door, no improvements to hinges. But I've got finished models. One's already in at the far end of the Glenwood siding and looks great!

SP modelers, expect me to be handing out phone booths as party favors for the next couple months.

Friday, August 15, 2014

I'm Un-Friending Burrito Justice

Normally, I'm a big fan of Burrito Justice, a San Francisco blogger who spends equal time talking about burritos, fog, Sutro Tower, Mission District happenings, and San Francisco history. His posts on the SP's route through the Mission are definitely worth a read. But then his big-city parochialism appears. In the latest article on the stringing of the first telegraph line from San Francisco to San Jose, he makes the sarcastic comment:
Another way of looking at it — the people of San Francisco were so isolated they actually got excited about talking to people IN SAN JOSE. I mean, that’s pretty isolated.
I could make a smart-ass comment about that's just the sort of comment you'd get from folks who live in fog and don't eat enough prunes, but that would just be sinking to his level.

Wednesday, August 13, 2014

3d Printing: Not for the Claustrophobic

When I was a kid, I loved exploring - climbing the big cypress near our house and finding paths to the top, or figuring out ways to reach the roof of our house. I even crawled under our house a couple times, and only once because my dad needed help getting the TV antenna wire under the house. That kind of fun stuff isn't just for kids. I remember when my aunt first started using a computer, she was playing a 3d game and managed to get into a place that was *just outside* the virtual world. Suddenly, she was seeing the back side of all the scenery and models, and could see how the scenery is constructed.

I'm getting to do that crawling around and exploring with 3d modeling too. SketchUp, my favorite tool for 3d modeling, started as an architectural sketching tool. Although it can do three-dee models, one weakness is that it doesn't always make perfect models suitable for printing. Most 3d printers expect the model to be watertight: no holes in the faces making up the model, or gaps between faces. Most 3d printers also expect that there's no hidden faces embedded inside the model. These two requirements are needed so the various algorithms for figuring out the 3d shape can figure out what counts as inside the model, and what counts as outside. One of the simplest ways to determine inside/outside is to draw a line through the model, and count the walls you encounter. If you find an odd number, then your end point is inside the model; even, and you're outside. Extra faces and holes mean the software loses track of the model shape, and you end up with a model with either odd faces, or even odder parts missing. SketchUp doesn't enforce either of those rules, and while there's software to check and fix models for you, it's a pain to have to use the external tools to do a sanity check after each bit of creative drawing.

That means my three-d modeling habit involves a lot of what I did as a kid: crawling around in strange places looking for signs of extra faces that should have been deleted. The picture at the top shows the 3d model of the telephone booth model in SketchUp. I've deleted the faces making up the bottom surface of the model, but you can see the outer wall, the hollow inner surface (light gray), as well as all the inner surfaces marking the limits of where the printing material goes (in light blue). On the left is the reverse image of the doorway; the four cylinders sticking out are actually the ventilation holes on the right side of the model. Although the original model only took about 90 minutes to draw, probably half that time was trying to fix faces that were either on the hollow inside, or were incorrect faces on the inside of the model.

So if you ask me what 3d printing means to me, it means an awful lot of crawling around in confined spaces. Good thing I'm not claustrophobic.

Tuesday, August 12, 2014

SP Concrete Telephone Booths

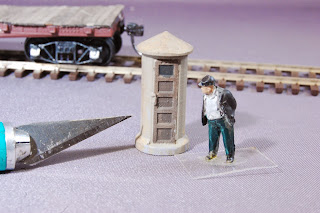
Here's the result of that laser light show - a lot of Southern Pacific concrete telephone booths. These were placed out at the ends of sidings out in the boonies, and gave the crews a way to contact the dispatcher in the days before radio.

These are great models for 3d printing - they're small, geometrically simple, annoying to scratch build, and rare enough so they're unlikely to be at the hobby shop. (To be fair, there are two manufacturers making the more modern versions of these, so I'm exaggerating a bit... but you get the idea - little, railroad specific details like this are perfect for 3d printing.) I'm not even the first one printing these; someone's selling 3d-printed N scale models on the Shapeways site. Building the 3d model in SketchUp took probably an hour and a half, and I was looking at finished models later that evening. There are even plans and drawings available in the Common Standard Plans books.

3d printing really comes into its own when you need a bunch of these. As the video showed, printing twelve of these wasn't a stretch. The first run had one obvious problem - SketchUp, because it's intended for architectural models, draws curves surfaces as a set of flat facets. By default, it uses 24 faces for a cylinder, or six faces for a 90 degree turn. On the first models, I could see the pattern on the model. Redoing the model with 48 faces/cylinder appears to make surface look perfectly curved. (Hint: when drawing a circle, type "48s" in the text box at the bottom of the window to change a circle to 48 sides.) Even with that problem, the models came out awfully nice, with the doors crisp, and some added coarse detail for hinges, latch, and handle all being visible under the magnifying glass. The models did get the characteristic vent holes in the door, though it's hard to see on the model. Although the upper panel in the door looks solid, it's glass in the real model. Rather than create an opening, I'm planning to paint the panel gloss black to look like glass.

And so now I've got something like 24 telephone booths, when I need maybe four on my layout.

I printed these telephone booths upside down. Because I print the model hollow, printing it from the bottom up would have trapped resin in the body; printing upside down gives the resin a chance to escape. The photo shows the support structure added by the 3d printer to handle the uneven surface; I cut off the support with diagonal cutters and finish with an x-acto knife and file.

Even though I've got twenty-four phone booths, they're not quite right. The second version got rid of the stair-step pattern and made the door more obvious, having it stick out two inches instead of one for better definition. Looking at real photos also shows some problems. This photo, for example, shows strap hinges. It's also obvious that the door's set back into the concrete cylinder. That little detail would be worth adding, but doing so would add the challenge of trying to highlight the separation between the door and the frame. That's the sort of decision that folks worry about in mass-production: what do you need to do to make the detail stand out, or make it easy to paint the model, or make it easy to build? (Think of the exaggerated detail of hood doors on diesel locomotives.) While setting the door and frame into the cylinder is realistic, I'd need to add a line between door and frame that'll need to be out of scale.

I also have to figure out how to finish them appropriately. I'm suspecting I'll be giving these out as party favors for a while, so figuring out to mass-paint a bunch of these would be a big win. I'm out of my normal concrete-gray spray can, so I'll show some painted models after my next trip to the hobby shop. I'm also starting to run out of my favorite Polly-S colors now that Testors stopped making the railroad colors, so I suspect I'll be in the market for new railroad paints soon.

Coming soon: the 3d flat cars are still going; I've tweaked the designs a couple times to match photos, and I've painted and decaled one. Because I had very few spare sets of decals with 1930's weights and dimensions, that decaling was painfully fiddly. Because I know I'm going to print at least 6 or 7 flatcars, I'm hoping to custom-print decals to make the job go faster. More news later...

Saturday, August 9, 2014

Movie Night XX: Better Living With Lasers

You've all probably seen my stories about projects being made with the new 3d printer, but here's some photos of it in action. My Form One is printing cylindrical concrete telephone booths. The real Southern Pacific Railroad put the full-sized ones along the railroad tracks in rural locations. (Real booth in the Sacramento Valley.) In the days before radio, they gave crews a way to talk with the dispatcher.

The clear resin and multiple cylinders make this print job a bit closer to fireworks than most of my prints!