Semaphores at the east end of Glenwood siding.
When is a model railroad “done”? Some might say it’s when it’s complete - when every scene is detailed and when the trains are running well. Some might say that a model railroad is always being changed, so it’s only “done” when it’s being torn down. I’ll throw out another option - our model railroad is “done” when we’ve confirmed that it’s the right design, when we’ve built enough to know “this is what it’s going to stay like”, and when we’re satisfied with the condition. One easy way to know when we’re satisfied is when we move from building new stuff to having to make big infrastructure changes - replacing a command control system, or changing control panels, or fixing other normally-invisible bits of the layout. If we’ve decided to do some wholesale replacement of some invisible aspect of the layout, that must mean the layout’s lasted long enough for us to need to do big repairs and that we’re happy enough with the layout to do the improvement instead of tearing down and starting a new one.
In my case, replacing the signal system suggests that I’ve done pretty good with this layout.
One of the pain points for my Vasona Branch layout over the last few years has been the signaling system. The real Los Gatos - Santa Cruz branch had automatic block signals (ABS) installed when the line was reconstructed after the 1906 earthquake. (Read Carsten Lundsten’s explanation of SP’s ABS signals here to learn what automatic block signals mean, and how the SP operated them.) The SP assumed the Los Gatos-Santa Cruz line was going to need increased capacity for future San Francisco - Santa Cruz traffic. As they upgraded the line from narrow gauge to standard gauge, they also added the automatic signals to minimize the effort of running trains over the mountains. In the narrow gauge days, keeping two trains off the same track required staffs and other physical tokens, or required explicit train orders to carefully control movements. Having multiple trains follow each other in the same direction was tedious and slow. The automatic block signals got rid of some of this work, allowing railroad crews to know the track ahead was safe to occupy. Note that ABS signals only provide protection, rather than authority. A green signal means that the track ahead is clear, not that your train is allowed to occupy that track. Those train order operators at the stations along the line are still needed to let trains know when they're safe to go.
On the model, the signaling system consists of a bunch of signals placed at intervals along the track, and a signal controller hidden underneath the layout. The controller keeps track of which tracks are occupied using detector circuits and notes which switches might be thrown away from the main line, and sets the ABS signals accordingly. Soon after I’d laid the track on the upper level of the Vasona Branch, I bought a pair of signal controllers - SIC24 (“Signal and Indicator Controllers”)
from Team Digital. The SIC24 is a small circuit board with a programmable chip on it; using a DCC programmer (or LocoNet), I could program in signal logic so that if a particular track detector indicated a train was present, or if the switch on either end of a single track was thrown wrong, a signal would go red. The Team Digital boards could also be connected together so that an input on one board could affect a signal output on the other. I used two boards for the needed 16 inputs and 48 outputs. All the signals were within about 10 feet of the SIC24 boards, so I connected all the signals with twisted-pair code 26 phone wire - no need for scattering electronics around the layout.

Old signal controller. Not my best work, but it worked for more than ten years.
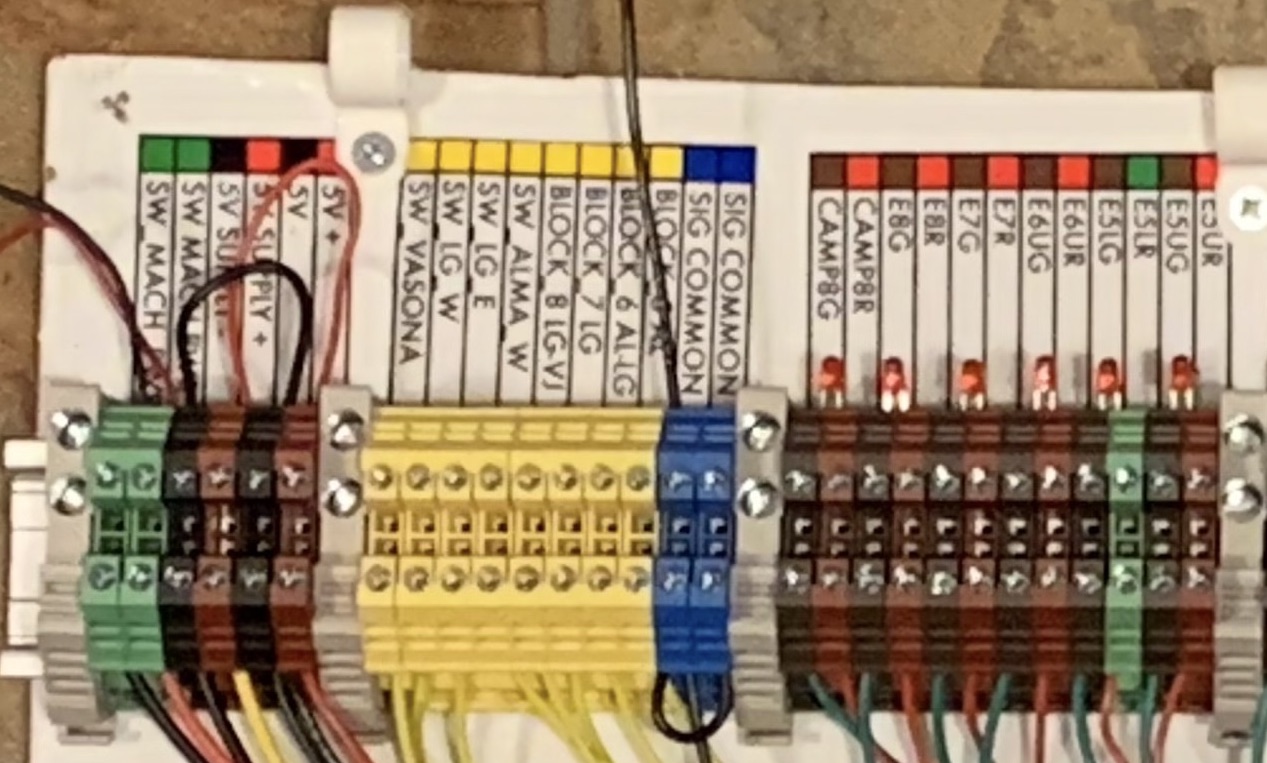
The photos shows one of the two SIC24 boards, and the phone cable providing the connection to the other board. This wasn't my neatest job, but it worked. You can see the signal power (large green wires with suitcase connector taps), inputs are yellow wires to the left, and signals are green/white and red/white wires below. I'd realized it was easier to put resistors on all the inputs and outputs here, so they're soldered onto the wires leading to the terminal strips. The odd shape of the plywood is because it's a scrap left over from cutting roadbed for curved track. I was unsure enough about whether the signals would be interesting that I didn't bother to build for good appearances.
The SIC24 boards generally worked well. They “just worked” when the power came on, they had sufficient smarts to run ABS, they were configurable enough to handle a couple of non-standard layouts on the place, and they didn’t require having a computer in the garage with the layout. Over the years, though, the SIC24 boards did start showing problems. One problem is that there’s no way to debug what’s going on; if the indications weren’t making sense, it was hard to diagnose exactly what was happening without attaching a voltmeter to inputs and trying to remember how I’d programmed the boards several years before. I ended up building a little circuit using an Arduino microcontroller board that could listen to the two cards talking and show on a tiny screen which inputs were changing, but that was clunky to use, requiring me to crouch under the layout, plug in the device, and look at a tiny 2" screen to understand what inputs were seen. Over the years, there were also times where it seemed that bits of the signal programming were getting lost. Because I don’t have any Digitrax equipment, reprogramming the cards meant detaching them from the layout, carrying them to a programming track, and attempting to reprogram the whole card from JMRI. I’d then have to reattach the card and see whether the change took - whether the signals now worked correctly. If they didn’t, I had to guess whether I’d mis-programmed the card or if the card was having problems. The several minute delay between making a change and seeing if it worked wasn’t fun, and caused me to give up on several bad signal problem.
I’d finally gotten frustrated enough to decide to replace the fifteen year old signal system a couple years ago. There’s plenty of choices out there, both commercial and home-made. The current NMRA Layout Command Control (LCC) standard defines how to build interoperable signal systems without a central computer. The LCC boards are expected to be scattered around the layout near the signals, then connected via a common bus to communicate. RR-CirKits is selling its Signal LCC and Tower LCC boards that work a lot like the SIC24s I’m currently using. However, they’ve still got the problem that debugging what’s going on requires a computer in the garage, increasing the work required for debugging. It also required me to get up to speed on a new technology, and I’d found some of the online manuals cryptic. Another possibility would be to go in the direction of Bruce Chubb’s centralized CMRI (Computer Model Railroad Interface). CMRI systems have a computer program control the signals, and defines how the different boards scattered under the layout all talk to the central computer.
Both of these are a bit of overkill for me. CMRI seems intended a larger and more complex layout than I have, and has expectations about having a desktop computer present running specific software. LCC has the decentralized and hardcoded logic that I liked from the SIC24, but has similar problems with monitoring and debugging problems, and required me to come up to speed on how LCC worked.
Unfortunately, my day job is as a software engineer, and so whenever I come across “do I buy something to make this happen, or do I just roll my own?”, I’ll often decide to go and build it. That’s often seen as a wasteful choice - why rebuild something that’s already available on the open market? However, for a small home layout, building my own makes more sense. I’ll know the design, know how to debug it when it breaks, and won’t be forced to do upgrades.
In a perfect world, I’d have a tiny Linux computer under the layout controlling the signals, I’d be able to write my own code for controlling the signals, and I’d be able to run a little web server to show the current status of the signals. That’s not a hard thing to do these days; I can buy a Raspberry Pi single board computer for $50. The only question was how to control the signals.
To keep my “no computers in the garage” rule, I chose to build from the Raspberry Pi. This is a little computer that’s the size of a deck of cards, but runs the UNIX operating system and can be logged into and programmed just like a larger computer. It’s easy to hide away, starts up within a minute, and is infinitely configurable. To handle the inputs from sensors on the layout and to power the LEDs for the signals, I chose Model Railroad Control System’s IOX32 boards, small boards with 32 inputs or outputs that can connect to a computer. The IOX boards are built for CMRI based layouts, but the way they talk to the computer, using the standard I2C wiring that lets different devices in a single computer talk, means they can be connected to the Raspberry Pi directly. I ended up getting a Raspberry Pi “hat” - an add-on circuit board that attaches to an expansion port on the Raspberry Pi - to provide the I2C connections. Finally, to help debugging, I bought a small two line display from one of the online electronics companies. This board also talks to the Raspberry Pi using I2C, and can be told to display short messages to help debugging.
This photo shows the new signal controller mounted on plywood. The terminal strips for power, inputs, and outputs is at the top. The Raspberry Pi is the box with the red board in the lower left. The IOX32 boards are to the right of the Raspberry Pi, and the display and 5 volt voltage converter for the IOX32s is to the left of the Raspberry Pi. The crossing wires were needed to match the layout of the terminals on the old and new boards.
As can be seen from the photos, the signal system has a lot of wires going in and out. In order to make the replacement go smoothly, I set up the new system on a plywood board with terminal strips for all the connections, then wrote the software to control the signals and tested it on the bench. This also helped me confirm that the IOX32s could correctly drive the LEDs I use for signaling. More importantly, I made sure the terminal strips roughly matched the layout of the existing board so I could disconnect the old board, detach the old wires, put in the new board with controller, and reattach. I also made a few very good choices to help installation - painting the board with the electronics white for easier viewing under the dark layout, printing up very clear labels indicating the purpose of each terminal, and making sure I had good terminal strips for attaching the connections.

New signal controller in use. LEDs are for signals that aren't yet connected - I've added LEDs on the terminal strip to check their state.
Finally, I took a deep breath, detached and marked the existing cables, pulled out the old controller, and put in the new one. The new system required a bunch of manual work - soldering extensions on too-short wires, changing how some of the detector circuits were powered to ensure a safe common ground between equipment around the layout, and slowly reattached and tested that the signals still worked. This all happened within a couple long days, but it went well with no surprises.
The Raspberry Pi did make it easier to debug. Checking out the existing signals, I found one of my long-lived problems was an incorrectly-attached input for one of the switch positions. I also found some incorrect assumptions in my signal programming, and with a few lines of programming changes was able to get the signals working like the real thing. Debugging is, for now, looking at text logs spewing from a computer program, but I’m looking forward to writing some code to show the layout state on a web page next. I even added a lamp test action at start that flashes all the signals - this makes it easy to double-check that all LEDs are connected and are working.
The biggest drawbacks? The Raspberry Pi does have more complexity. It's a full fledged computer with a boot disk (stored in these modern times on a MicroSD flash memory card.) If the boot drive gets corrupted, then the signals won't work. I’ll need to keep a backup SD card just in case things break.
I must be happy with the Vasona Branch, because I’ve done a big wholesale replacement of the signal system. It took several weeks to get the home-brewed signal controller ready, but all the planning and preparation made swapping the old for the new an incredibly pleasant exercise. I now have much better control over the signal systems, can better understand why it misbehaves, and can quickly fix it so it works correctly in a prototype manner. There’s still lots to do before the layout is fully scenicked, Being willing to do this wholesale fix, though, reminds me how happy I am with the current layout, and how far I’ve come.