

In my last post about replacing the Vasona Branch's signal controller, you might have spotted those odd terminal strips in the pictures of the new signal controller. These are the Dinkle modular terminal strips (the 2.5N size) intended for professional use on industrial controllers and electrical panels. As someone who grew up using the vintage Molex black terminal "barrier" strips from Radio Shack, the terminal strips definitely feel like I’m in a new century of wiring practice. The individual terminals in multiple colors clip together onto a DIN rail, a common mounting bracket for electrical equipment like controllers and circuit breakers.
I found them great for model railroads (as compared with the traditional terminal blocks) for a few reasons:
- packs more terminals in the same space - about 3/16" per terminal
- multiple colors so easy to identify terminals and polarity
- inset test points for safer testing with voltmeter
- supports adding jumpers for wire-free connections between strips, and two jumpers allowed on any terminal.
- terminals are covered, so loose wire less likely to touch others.
- able to reconfigure as wiring changes - possible to pop terminals out of the middle to change colors, or move end clamp blocks to add terminals.

Close-up of the Dinkle 2.5DN terminals showing how they're wired and attached. Terminals are 3/16" wide, wire is 22 gauge.
The price is a bit more than terminal strips from Amazon; they work out to about 30c a terminal compared to 12c a terminal for the classic terminal strips. (They're all a deal compared to $4 each at Radio Shack back in the 1980's!) The other challenge is that getting an assortment of colors requires buying a box of 100 terminals at a time - that’s $30. Getting a good assortment (red, black, green, yellow, blue, white, and brown) requires spending about the same as a plastic locomotive. You’ll also need some of the DIN rail, and some of the end clamp blocks for securing a row of terminals. (For our low voltage uses, you don’t need the thin plastic endcaps to cover the last terminal in a row.) I’m planning on using all I need then selling off spare terminals to someone else if I've got enough unused terminals. I could also imagine having a group of modelers team up and share an assortment.

Jumper with every other pin cut. With these, I could line up a row of alternating green and white terminals for the different switch machine power feeds, then use two jumper barss to connect all to power coming in from a single pair of terminals.
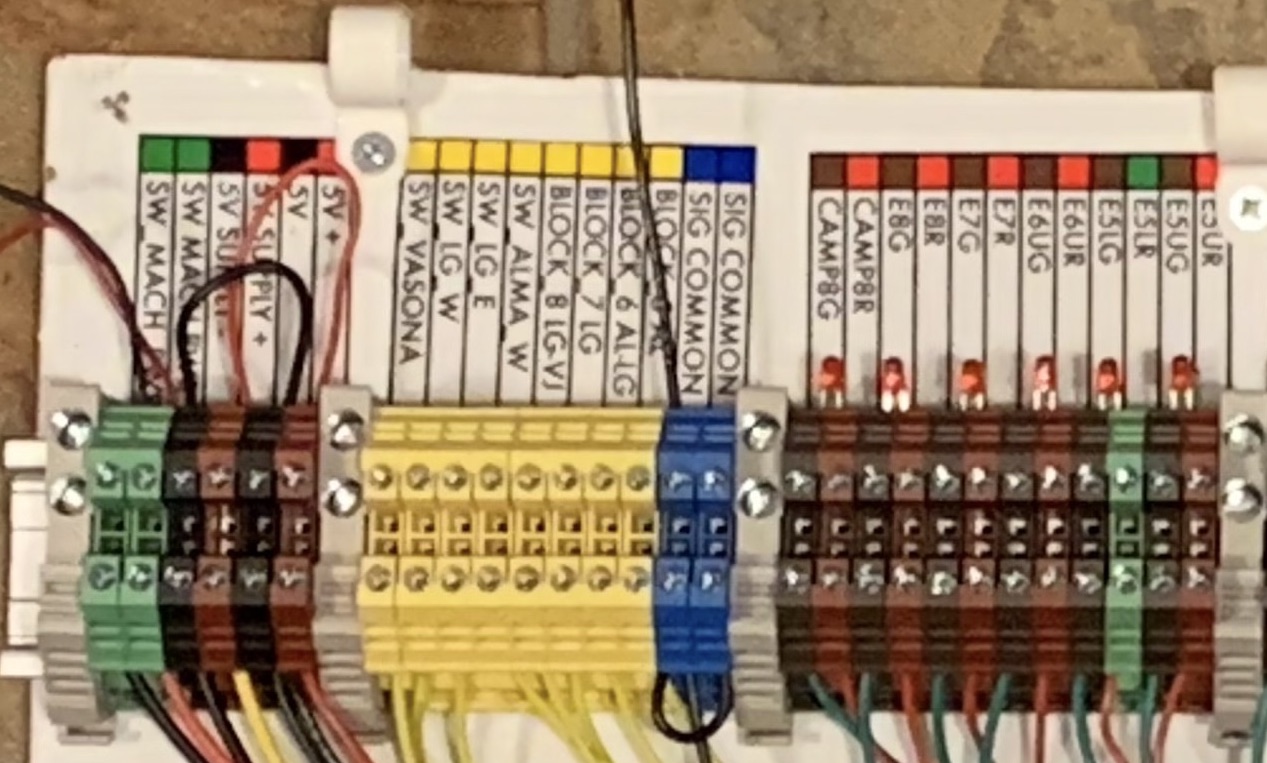
The colored terminals are particularly nice for documenting the wiring. I use different colors for DCC supply vs terminals going out to the tracks (red/white vs red/black), and could color code for signals easily (red/brown and green/brown terminals for “upper” and “lower” signal lights at same location. Sets of terminals can be connected together using jumper bars that fit into the top (and don't interfere with the screw terminals.) 10 terminal jumper bars are available, and can be cut shorter to gang several adjacent terminals together. For the switch motor power, I ended up cutting every other pin from a pair of the jumper bars so that I could feed in the two wires for power to one set of terminals, and have power distributed to all the other pairs simultaneously.
The color coding and labeling also helps me double-check wiring and remember how things are connected years later. When I rewired my DCC track connections using the new terminal strips, I realized I’d mis-connected power from multiple boosters to different stretches of track, probably because I lost track of which terminals were for which section of the railroad. That mistake caused me to melt at least one locomotive when it shorted against a switch but was still getting power from a different booster.
Drawbacks? I needed to use a smaller screwdriver to fit the protected holes for the screw terminals - I couldn’t grab any random home repair screwdriver to turn huge screw heads. The terminals also bent a little bit when pulled by larger wires like solid 12 gauge DCC buses, but work fine for smaller wiring.

One of the rewired panels. It's much easier to understand now!
I’m slowly going around the layout, cleaning up wiring, adding labels, and adding the new terminal strips. I’m very, very happy with these - the terminal strips make it easier for me to understand the wiring even years after I’ve done it, and they make the underside of the layout look neat and organized. I suspect I'll love the terminal strips even more in ten years when I need to figure out a rewiring I did in the distant past.
If you're interested in checking these terminal strips out: I got my Dinkle terminal strip parts from Amazon.com - search for "Dinkle 2.5N". Some sellers offer the components - separate purchases for boxes of 100 of each color terminal, for the end brackets which hold the terminals in place, the DIN rail, and the jumpers. Others offer assortments of 20 terminals of specific colors for common electrical projects such as solar panel controllers. The little assortment was a good way for me to decide the terminal strips were for me. I cut my initial cost when buying full boxes of connectors by just getting a few colors of terminals that I needed for some specific tasks such as re-wiring switch machine power. (I was using just green, white, and yellow for wiring connected to the switch machines.) I later got boxes of the other terminal colors as I rewired areas with other wire colors.
You can also see the terminal strips in use on the layout - the Vasona Branch will be open for tours at the NMRA Pacific Coast Region's 2024 Convention April 24-28, 2024 in San Jose.
No comments:
Post a Comment
Note: Only a member of this blog may post a comment.