Tuesday, July 29, 2014

Packing Houses in Edenvale, and Random Photos on Facebook

When I started researching the local San Jose packing houses in detail, I saw a couple mentions of a plant south of San Jose in the Edenvale area. It's a surprising neighborhood for any kind of industry - just prune trees for miles around, with the Hayes mansion sitting in the middle of it all. There's also little detail in the old newspapers or history books. (Just check out what little I found about the Edenvale Fruit Company on the Packing Houses of the Santa Clara Valley wiki. Supposedly, it was financed by the Hayes, and built of brick. Ed Richmond bought the business around 1918 just after he quit J.K. Armsby and went off on his own. A year later, when he teamed up with Elmer Chase to form Richmond Chase, the Edenvale plant was one of their star properties.

But I've never seen a photo of the packing house, nor have I seen anything other than the occasional cryptic reference to it. Kids remember it as one of the few sights along Monterey Highway in those days, and it was memorable enough to deserve a mention in a San Jose airport timeline: "1952: ...Fire destroyed the landmark Richmond-Chase Co. dried fruit plant at Edenvale, and Campbell became an incorporated city."

Well, history's trying to tease me. The picture above was posted to a Southern Pacific history group on Facebook, and *almost* shows the packing house. The photo is supposed to be a shot of Johan Hagemeyer, a local photographer who was best known for his portraits. For some reason, he was out in Edenvale one day. The photo shows the main line, the tiny whistle-stop station, and a line of boxcars along the siding. The shadows hint that the photo was taken in the morning, with Monterey Highway to our right.

And Hagemeyer is there, leaning against a loading dock for what will become Richmond Chase Plant #1. And the photographer couldn't take the time to turn just a bit to the left and capture the packing house itself.

And, as always, getting extra pairs of eyes looking at these photos helps us figure out history. Throw in comments if you see anything interesting in the photo, or go to the Packing Houses of Santa Clara County, and throw in the details you know about our town and our canneries.

Johan Hagemeyer's photo comes from his collection at the Bancroft Library; the library classifies it as part of his early photos, and probably taken between 1908 and 1915. The Johan Hagemeyer Photograph Collection is available at the Online Archive of California. Great thanks to Dale Phelps for posting this on the Southern Pacific Railroad page on Facebook, where I saw it.

Tuesday, July 22, 2014

Movie Night XIX: Putting Up Cots with Mabel Mattos

It's a little late for this year, but if you need some inspiration to preserve apricots next year, then take Mabel Mattos's advice. The Milpitas Historical Society was kind enough to record and share Mabel's cooking technique.

Saturday, July 19, 2014

Sneak Preview #1: The Rejects

One of the unspoken parts of 3d printing is that you're pretty much testing out a production line. You need to figure out the best orientation for printing the object, do test shots, and iterate.

For example, do I need a support structure to hold the print up while printing? For my first attempts at the CS-35A flat car, I tried printing the top of the car directly on the build platform. Prints on the Form One grow layer-by-layer starting from the surface of the build platform, so I'd get a nice flat surface. I'd save resin because I wasn't spending it printing a support structure to hold the piece off the platform. I'd also have a lot less cleanup.

It didn't work - for whatever reason, the thinner areas just above the table don't always print reliably. You can see it in this pile of rejected pieces, with rotted-out holes showing where the resin didn't harden.

And that's a real CS-35A, 40 feet long just below it. More about that later.

Wednesday, July 16, 2014

Sulfur Houses and Drying Trays

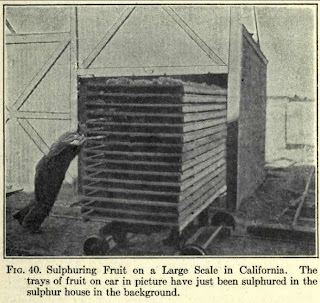
And if you're curious what those drying flats looked like in real life, read about Ann's Grandma Elsa and drying peaches. She also included this neat photo of a industrial-size sulphur house. If I'd seen the photos of those vertical doors, I would have included them on my model!

Grandma Elsa Cutting Peaches

Monday, July 14, 2014

The WP Crossing: Then and Now

While I'm crazily posting 3d printed stuff, I might as well share a photo. You all might remember the photo of the WP railroad crossing taken by John Barriger in the mid-1930's. If you're not local (or haven't done wandering near Auzerais and Lincoln recently), take a look at how things have changed in... 80 years.

The discount furniture place on the right side of the tracks, a.k.a. Castlewood Wines, a.k.a. St. Claire Brewing, a.k.a. Virden Packing is still there ninety years after it was built, and the corrugated steel looks near-original. Behind it, apartments replace the former U.S. Products cannery warehouse. On the other side of the tracks, Sunsweet's packing house (former George Herbert) is long gone, replaced first by office buildings and now by San Jose Medical Group's offices. The little white building used for sack storage is also gone, as is the row of power lines along the right of way. There's little sign of the WP's crossing any more; the mismatched fence may be it, but it's hard to tell. And the former Standard Oil terminal on the immediate left, now a roofer, still has a substantial fence.

If you go wandering down this way, definitely check out the little house that got swallowed up by Virden Packing - it's barely visible over the fence. If you go into the furniture store in the former cannery, you'll see the half-eaten house serving as the office for the store.

[Left photo from the Barriger collection at the University of Missouri. The library's been kind enough to share many of their photos on Flickr; go check 'em out, and thank them for providing high detail scans! Right photo: my photo.]

Sneak Preview: 3d Printed Flat Car

Here's a preview for a future article: a 3d-printed Southern Pacific CS-35 flat car, circa 1903. I printed this on the Form One resin printer. The deck of flat car is individual pieces of stripwood, stained with india ink.

My obvious mistakes:
  • wrong number of stake pockets (should be 8 per side, not 9).
  • set of 12 rivets over trucks should be 6.
  • Deck is too narrow - the wood should stick out a few inches beyond the frame.
  • The CS-35 was made of fabricated steel components, and should have a hard edge on the bottom edges of the side. The curves are appropriate for the CS-35A, which used pressed steel components.
  • The car never really existed, it seems.

That last point was the killer. Tony Thompson's Freight Cars book shows two sets of plans for the CS-35 and CS-35A; only after I built it did I notice that niggling detail that there was no other mention of the CS-35 in the book. The 36' CS-35 was never built; instead, the SP went with the similar 40' CS-35A. Making a design for the CS-35A involved selecting each end of the car in SketchUp, and dragging it out to the proper length.

It's also been a pain to figure out how to print these reliably - to fit on the build platform, each is printed while leaning 20 degrees to the side. But I've now got castings for both the 36 and 40 foot cars. Once I've added a bit more detail on the underside, I can print enough freight cars to keep the Santa Clara Valley Mill and Lumber mill on San Carlos Street busy.

3D Printing Stories: Flats of Drying Apricots

[Sorry, history buffs - feel free to skip all the 3d printing and model building articles coming up.]

Here's the latest project for the 3d printer: stacks of drying flats.

The new version of the "Abinante and Nola Packing House" is getting finished. The building is now labelled as J.S. Roberts, the actual occupant in the mid 1930's. I've got the rough building done, but there's still some details... like a roof... to finish. But it's looking finished.

The J.S. Roberts packing house had one unusual feature: a separate addition contained a "sulfur box" - a sealed box where apricots could be smoked in burning sulfur fumes to preserve the fruit and keep the bright orange color. Many farm drying yards had a makeshift sulfur box. However, our packing house had the sulfur box on the third floor, right next to where the fruit would be sorted and graded. That makes some sense - the dried fruit would be brought to the packing house in sacks, and carried to the top floor for sorting and grading. If it met our packer's standards, it was dropped into bins on the second floor, and pulled out on the first floor for boxing. Having the sulfur box at the top meant that it was queasy to unload.

Now, having that third floor addition for the sulfur box is kind of interesting - it's 20 feet off the ground, and probably stuck out because of the different construction and exterior look. I took some creative license, and decided having burning anything close to the main building would be inappropriate, so I put the sulfur boxes on the far side of a small deck off the second floor. And if I've made the sulfur boxes visible to the outside, I'll also need to show the fruit going in.

That means I need drying flats - the real sulfur boxes would have taken stacks of flats each holding a layer of apricots. Drying flats are useful for other scenes on the railroad. In farm drying yards, women in the cutting shed would have halved apricots and put them on the flats; stacks would then have been rolled on small carts out into the drying yard to be laid out for drying in the sun. I've made a few drying flats by hand out of card stock and 1x4 scale lumber, but those pieces are tedious, small and fiddly. Doing a stack of 15 would be even worse. Luckily, a 3d printer doesn't know about tedious.

The drying flat stacks are about 3/8 inch wide, one inch tall, and one inch deep. The center of the model is hollow, but the individual flats are actually separate on each end. These were painted with a weathered black, then washed with Floquil grime for a translucent, white look of weathered wood. I made stacks in several different heights: five flats, 12 flats, and 15 flats. Printing some individual flats would also be fun, but I'll need to figure out how to set up the prints.

I did the 3d design for these in SketchUp, which is wonderful for rectangular designs like these. My first designs were too thin; I'd started with a one inch lumber border around each frame, but the printer needed walls to be more substantial than 0.010 inch. The image from SketchUp shows how the side rails were two scale inches wide except for the top frame. Each flat goes back 1/8", with the bulk of the model hollow to save on resin. The fruit isn't very realistic, but it does add a bit of detail.

I'm not the only one making industry-specific details on a 3d printer. Ken Harstine has been selling orchard ladders, field boxes, and fruit lugs at Shapeways for quite a while, and his models definitely inspired me to see what I can print.

Still to come: flatcars and lumber loads, straight from the 3d printer!